Command line example
This example shows how to use a simple command line utility in ImageTank. It includes steps to set up the search paths and build using Xcode. Once you have gone through this example it will be much quicker to add additional programs. This document is broken down into the following sections
- Set up a search path for external projects
- Create a simple C++ Xcode project and include DTSource
- Connect to this executable in ImageTank
- How to extract data from the output
- How to debug your program
Search path
When sharing ImageTank files it would be frustrating to have to require everyone to have the same file structure so that external programs will continue to work. Also, you want to make it easy for several ImageTank files to use the same project. To help with that, there is a search path that ImageTank uses to find your Xcode project. This needs to be set up in the preferences.
One suggestion is to create a folder called “Xcode Projects” somewhere. Note that when Xcode creates a project it creates a folder for that project and the source code and project file are inside that folder.
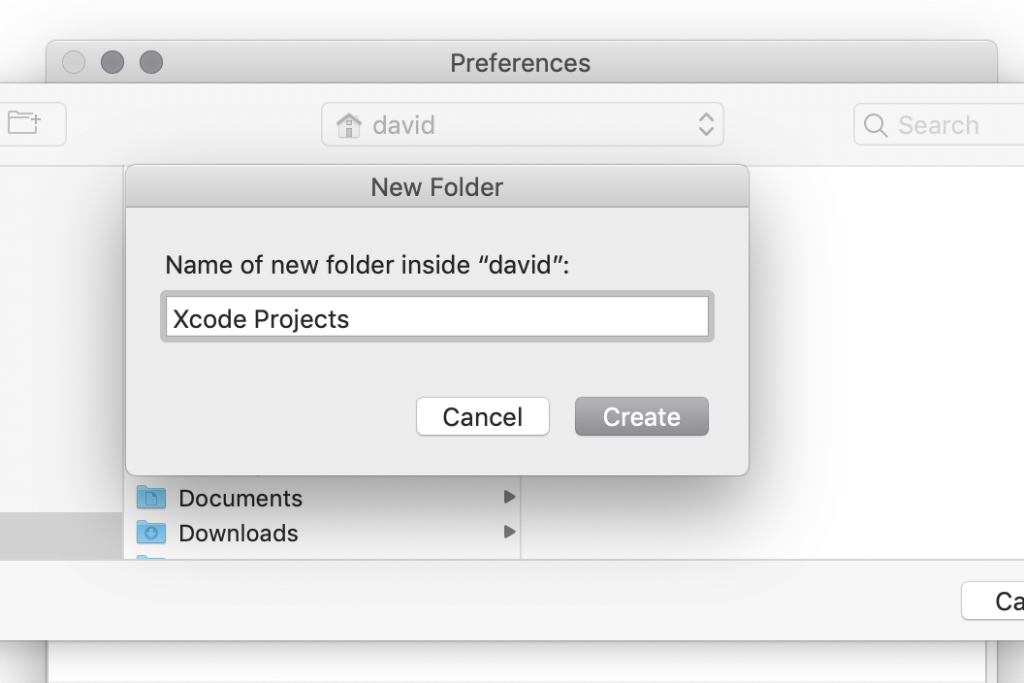
Note. The project you select is the folder that will contain the Xcode folders, not the folder that contains the .xcodeproject file. This way you can put multiple Xcode projects into the “Xcode Projects” folder without having to go to the preferences window again.
Simple Xcode project
First step is to create a command line utility program. Go into Xcode, create a new project and select the command line option. Should look something like this
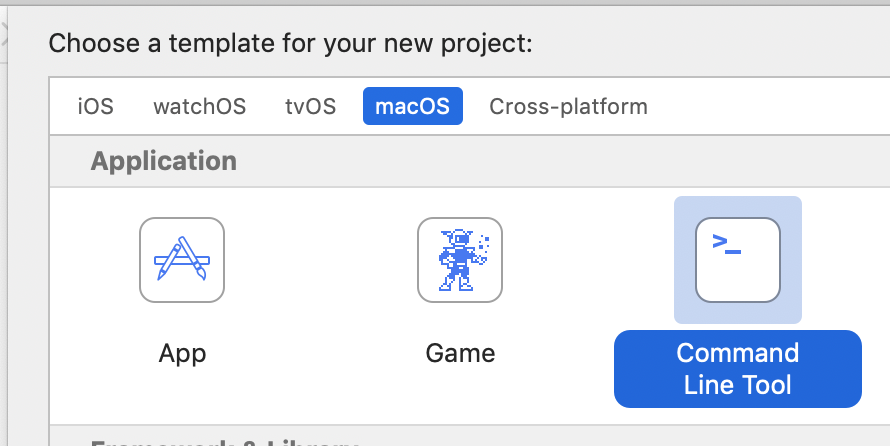
The name you give is the name you will use in ImageTank. The name can have space in it, but if you want to also use it from the command line you might want to avoid them.
Make sure that you pick C++ as the language, and then click the Next button. Make sure that you go into the folder that you created in the first step. Note that you should not create a folder for it, Xcode will do that automatically. Don’t put it into any sub-folders, unless you also add those into the search path in the Preferences panel. Hit the Create button to create the project.
In this project we will use the DTSource library that comes included with ImageTank. This is not necessary but makes it easy to create a somewhat interesting example using very little code. In the file menu, select the entry to add files.
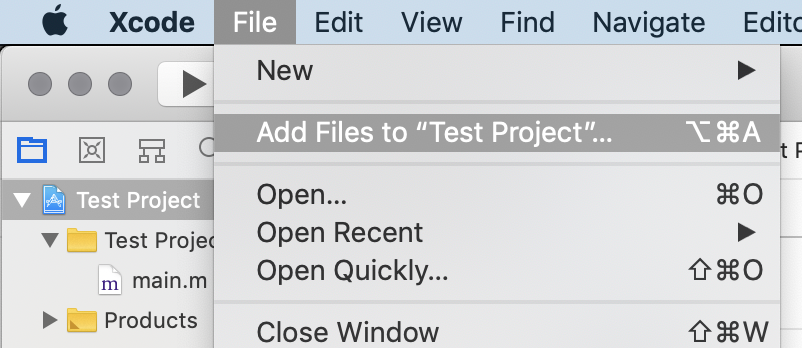
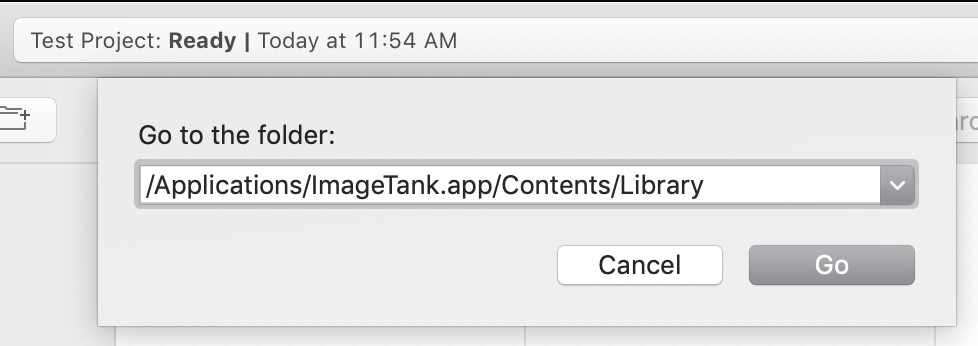
The DTSource library is located inside the ImageTank application wrapper. Since you can’t easily navigate into the application, you need to specify the path name. This can be done with the following handy trick: When you are in an open dialog, press the / key. This will pop up a small dialog box to go to a particular folder. Type in the path name
/Applications/ImageTank.app/Contents/Library
and hit the return key or click on Go.
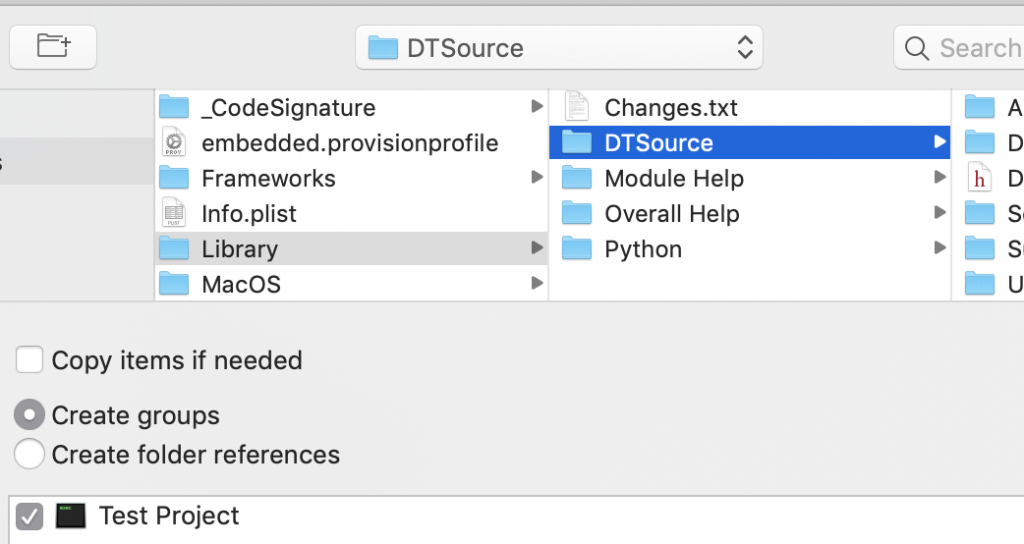
Then select the DTSource folder and hit return. Make sure that the “Create groups” entry is selected and you are adding this to the current project. This should be selected by default. Also, make sure that the project is checked so that you add the source files to the target as well as the project. That is the small check box in the lower left corner of the following screen shot.
Overwrite the content of the main file with the following code. Note that if you forgot to set the language to C++ in the previous step, you have to change the file name from main.m to main.cpp
#include "DTArguments.h"
#include "DTDataFile.h"

#include "DTTable.h"

int main(int argc,const char *argv[])
{
    DTSetArguments(argc,argv);

    // Allocate and initialize two lists
    int size = DTArgumentIntegerEntry("size"); // -size number
    DTMutableDoubleArray x(size), y(size);
    int i;
    for (i=0;i<size;i++) {
        x(i) = i*0.1;
        y(i) = sin(5*x(i));
    }

    // Create a table object based on these lists
    DTMutableList<DTTableColumn> columns(2);
    columns(0) = CreateTableColumn("x",x);
    columns(1) = CreateTableColumn("y",y);
    DTTable table(columns);

    // Write the output to the file name that I specify
    std::string outputFileName = DTArgumentFlagEntry("out");
    DTDataFile output(outputFileName,DTFile::NewReadWrite);
    WriteOne(output,"table",table);

    output.pinfo(); // For debugging purposes

    return 0;
 }
Now compile the program (Build in the Project menu)

Call from ImageTank
In the previous step we created the project “Test Project”. Next step is to call it from ImageTank. To do that we need to create a File object. In the File toolbar entry, create a file object for this purpose

In this entry, click on the side panel icon. In the screen shot is slightly darker on the left side
There are a lot of entries in the window that pops up.
- Input variables : This is a tab to specify input entries that are visible in the interface that gets built for the variable. You can hand in numbers, text or file objects.
- Arguments : This is where you build the argument list. Here you can reference the input variables.
- Current argument : Displays the result of the previous block. Needed for debugging. Copy just copies the current argument into the clipboard.
- Program : Where you specify what program to call, here it will be your Xcode project. The buttons are used to open the Xcode project, save the input files for debugging and tell ImageTank that the project was updated.
- Debug : Allows you run the program and see the console output. ImageTank will ignore that and pick up an output file, and the name of that is specified here as well.
- Execution log : Shows the output from executions that are done as part of the pipeline execution. That way if something goes wrong you can look at the standard out/error.
- Notes : A way to add comments.
Open these entries up and edit them as shown in the following screen shot
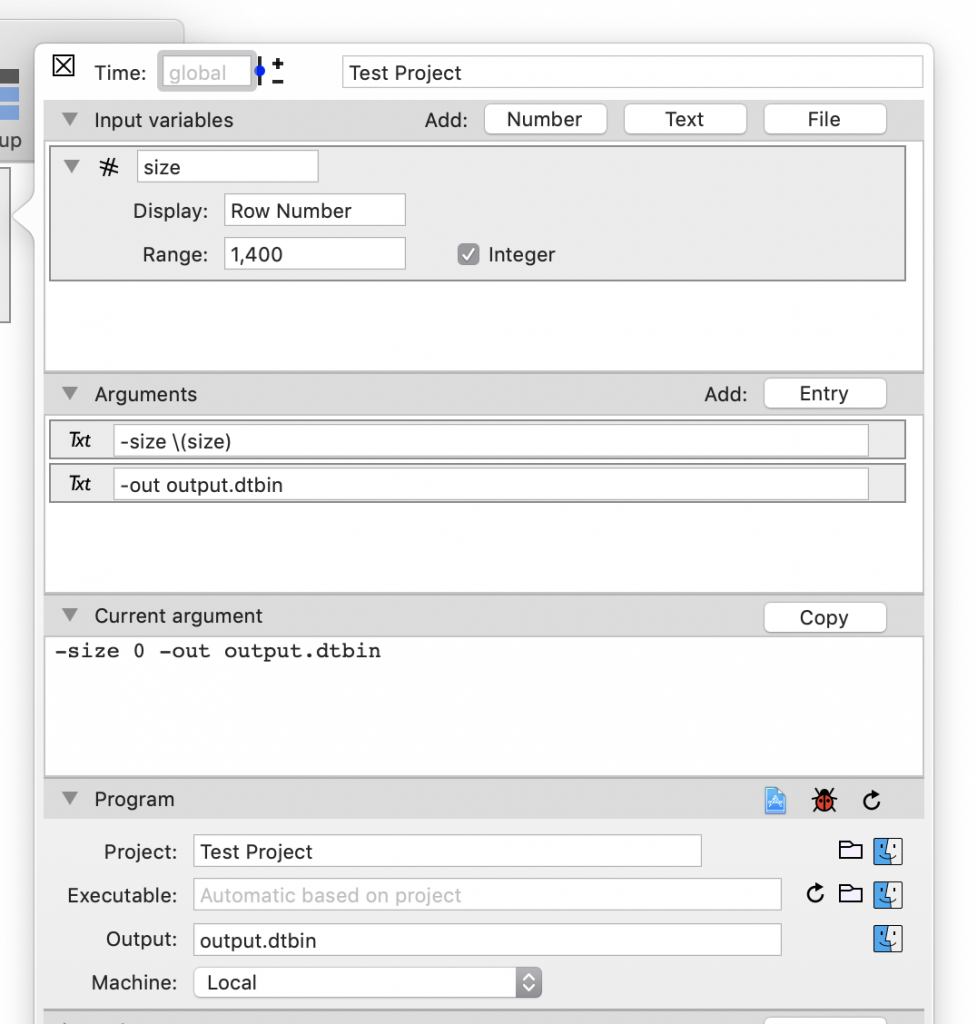
For each block we did the following
- Input variables : Click on the “Number” button. The top name is the name used when building the argument. The Display name is the name for the UI, so that will typically be longer. Since I want a slider option, I specified a range and selected Integer so the value will be rounded to an integer.
- Arguments : Clicked twice on the Entry button. These will then be appended with spaces for the final argument. Note how the size is referenced. The \(size) syntax is copied from Swift (the programming language).
- Program : Type in the name of the project, not the path name. You can also click on the small folder icon to select the Xcode project file. Click on the code file icon in the header of the entry to open the project, or the Finder icon to show the project folder in the Finder. The Output field is important since this is the file that the program is expected to return. The ending is important, because the context menu entries will depend on the file ending. Adding the .dtbin ending indicates that this is a data container. The Machine selector should stay at Local. You can choose to run your program on other machines, either other Macs or Linux machines.
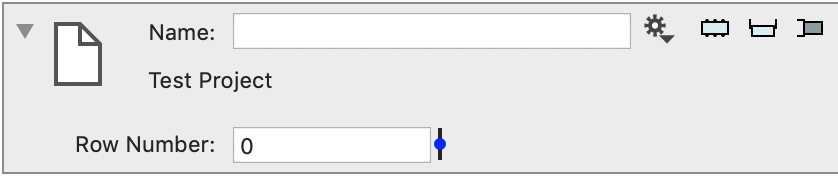
If you look at the details of the File object you will see the number field with the slider. The default value for a number is 0, so you will want to change that by either typing in a value or using the slider (blue icon on the right)
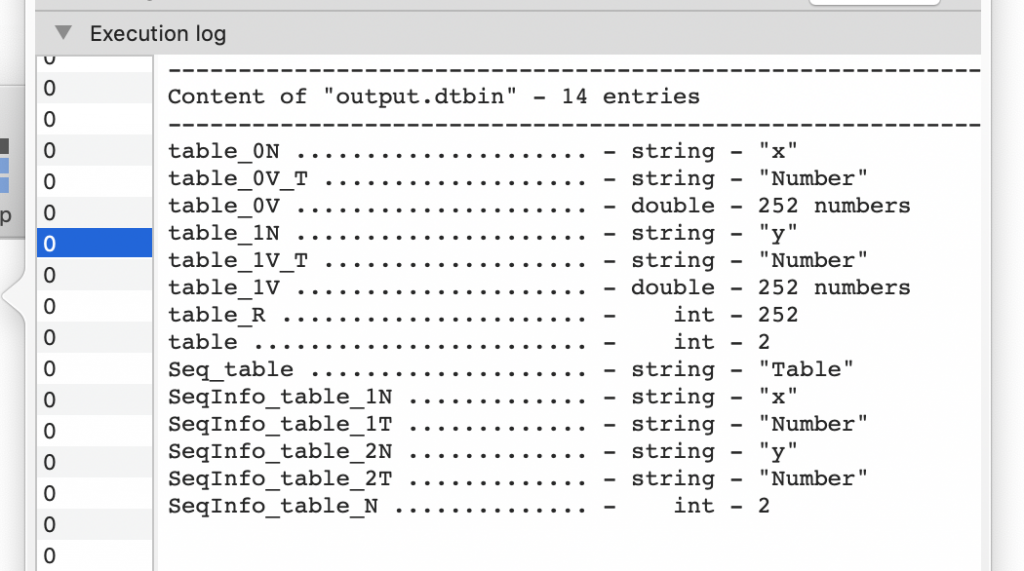
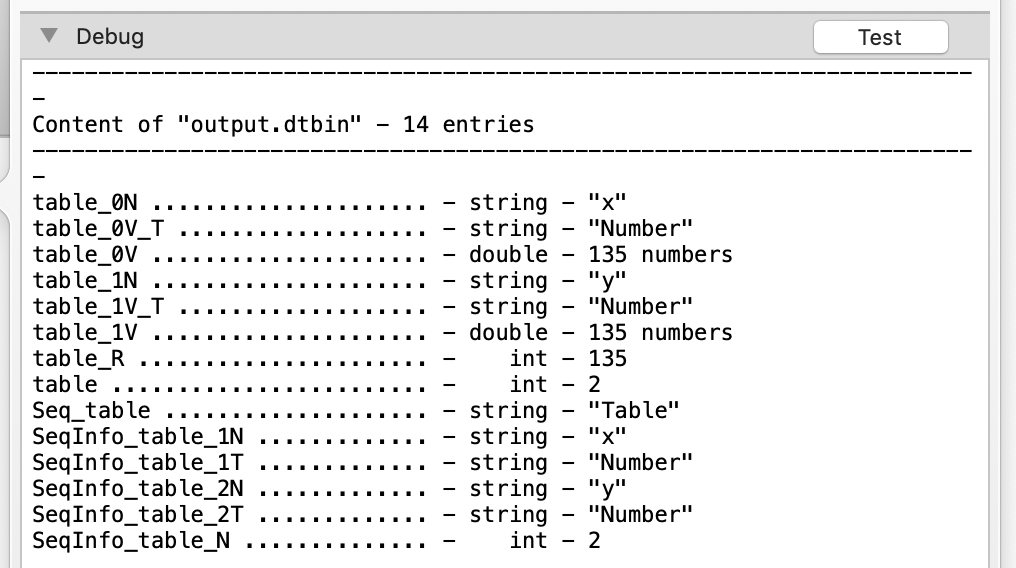
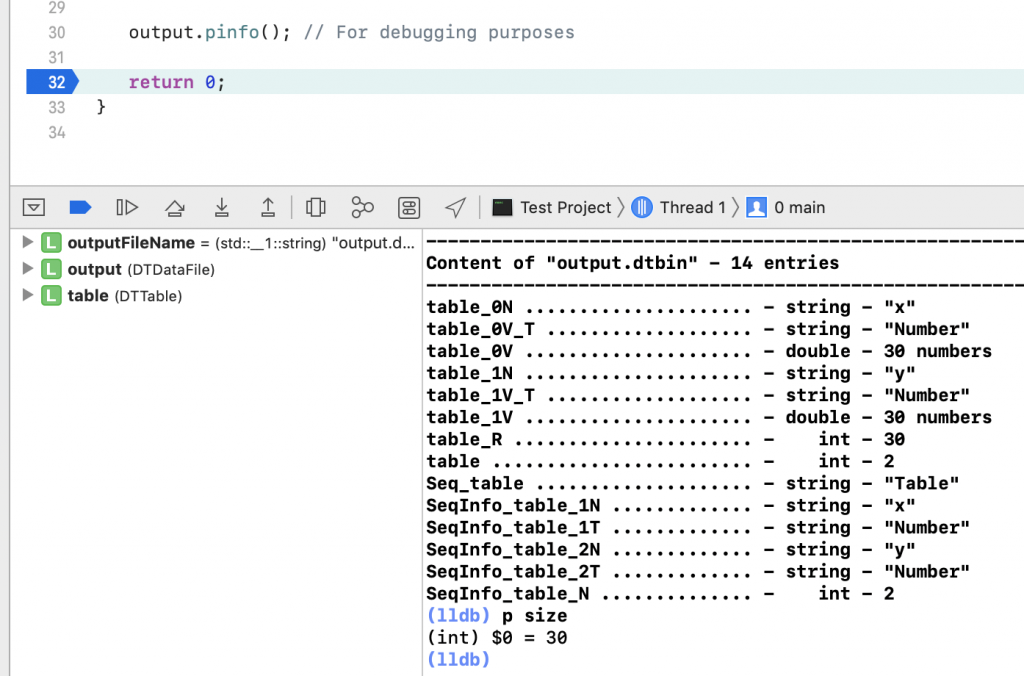
Next step is to make sure things work. In the Debug entry, click on the Test button. This is the reason for the output.pinfo() entry in the code. This is the raw content of the data file, which is a collection of named arrays, numbers and text.
Now you can close the side panel and just view the variable
When ImageTank needs the file, either for further computation or just to display the variable monitor it runs the external program for you. What happens behind the scenes is
- Creates a temporary folder
- Puts the input files into that folder with the name you specified. This is done by using what is called a hard link, so it will not actually copy the folder. If the file is on a remote file system it will create a symbolic link
- Runs the external program. All of the steps are done in a secondary thread so the user interface will not stop. The program is launched with the temporary folder as the home directory with the argument you specified. Note that if an argument needs to have a space, you need to enclose it in double quotes – “for example”.
- You can abort the execution by clicking on the progress bar that pops up in the top right. Note that you could have multiple instances running at the same time.
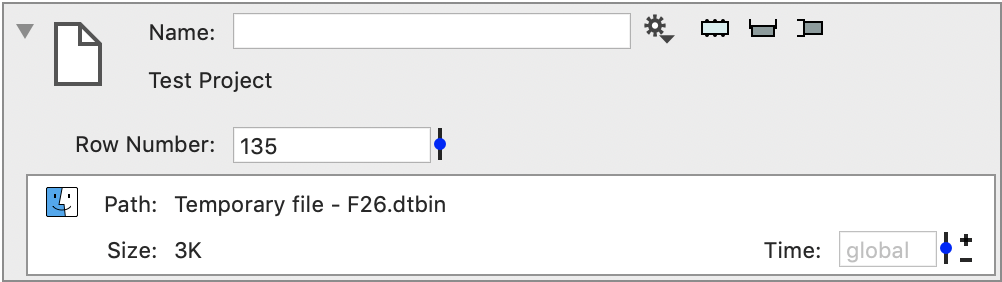
- When the program finishes, the output file is moved out of the folder and into a folder that ImageTank manages. In the screen shot above you see that it is listed as a “Temporary file” and you can click on the small Finder icon to show that file in the Finder.
- The temporary folder is removed, and any other files that were saved into the folder are deleted.
Extract the output
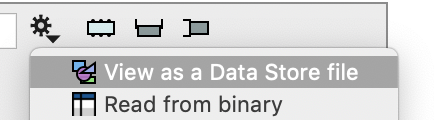
Because of the .dtbin ending, ImageTank knows that this is a data storage file. When you click on the Gear button you see an option to view the file as a Data Store file. If the file is an STL file you will instead see an action to read a surface from this file.
The output is a group variable. Click on the side panel to open the settings. You need to specify which variables you want to read from the data file. In this case there is only one variable, so select that. If the structure of the table changes (new columns defined) you need to go here as well and toggle this check box so that ImageTank will use the latest structure.
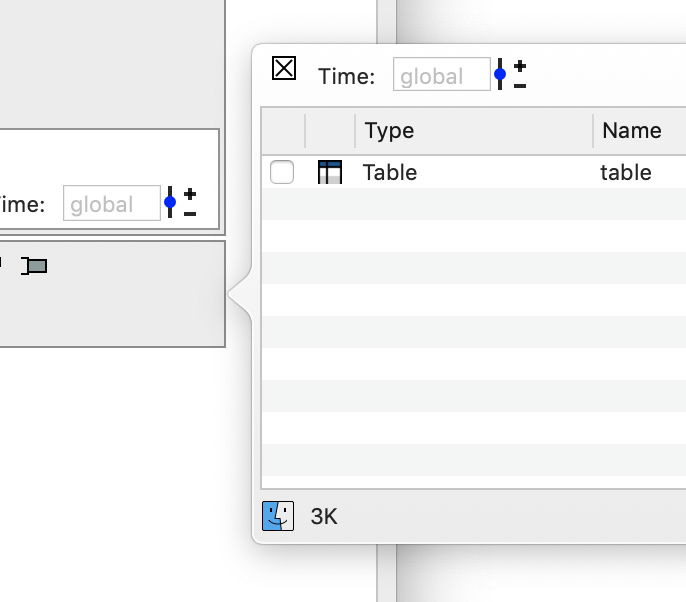
Now the variable monitor will show the result
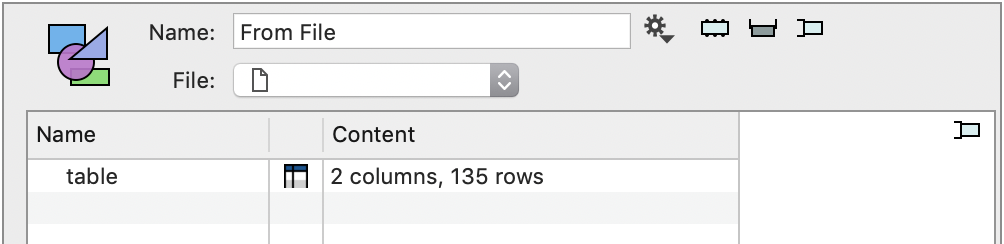
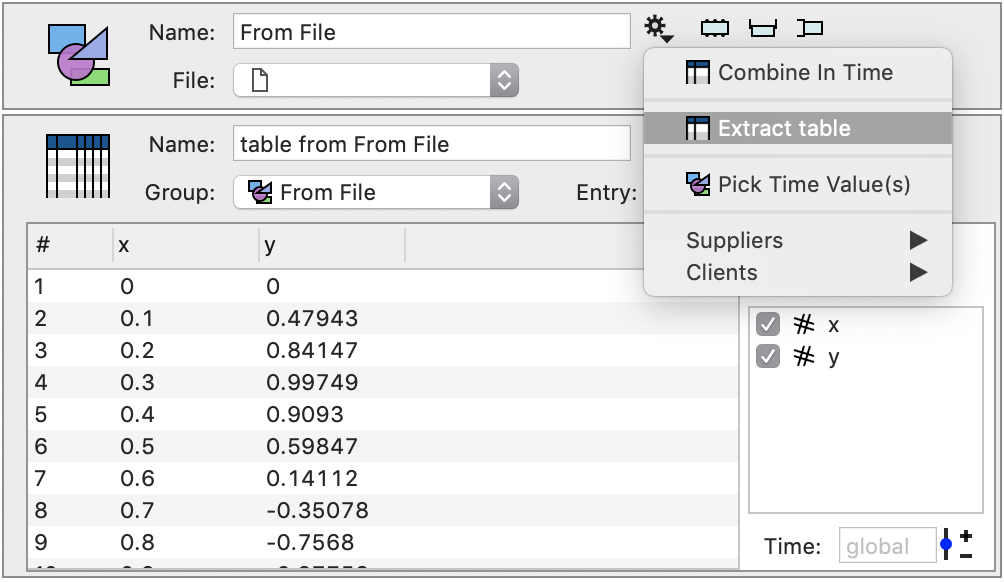
Use the gear menu to extract the table from this group
When you change the input, which in this case means varying the slider, the program is run again and everything is updated.
Debugging
Debugging often involves running your program with a variety of inputs and monitoring when something unexpected happens. Using this method of calling your program, one way is to stop when you see the input is problematic and then head into the debugger with this input.
In Xcode you can compile both a debug and a release version of your program. What ImageTank does is to pick the newer version of the two applications. That means that if you are working in the debugger the version that ImageTank will use is the debug version. That is typically significantly slower than the release version, so just remember to recompile for profiling so that the release version is updated.
You can also move over to Xcode to debug your executable. The steps to do that are as follows:
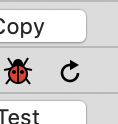
- In the side panel click the small debugging icon (bug in the middle) if you have any input files. This will save the files into the Debug folder for the project. Then click on the Copy button above it. That copies the current input arguments to the clipboard. Then head to the Xcode project by clicking on the Xcode project icon

- Once you are in Xcode, click on the application menu in the toolbar. This pops up a menu. Select the “Edit Scheme…” entry
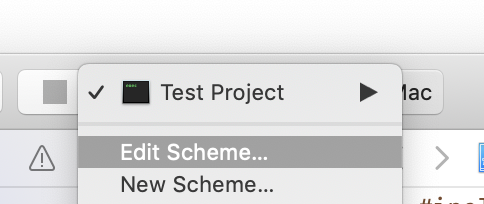
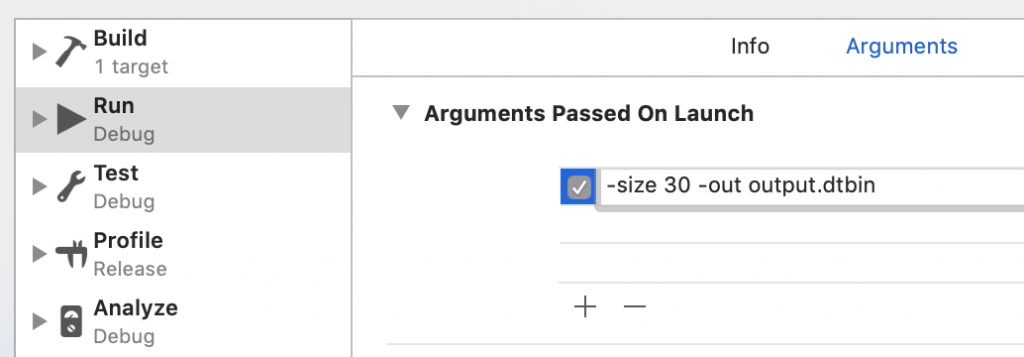
- Select the “Run” entry, and click the + button in the argument tab. Paste in the command line argument that you copied by using the Copy button. Any time the argument changes you need to update this entry.
- Then set breakpoints and click the play button in the toolbar to debug the program. Note that if you are using the DTSource library there is a lot of functions built in that you can call from the debugger window to inspect the content.
- Once you fixed an issue, to have ImageTank use this new version and flush out any cached results from the previous version click on the reload button.
Execution log
When ImageTank needs the result and it is not already cached it will go through the steps listed above. That is, create a temporary folder, copy input to the folder, run the program, collect the output and remove the temporary folder. ImageTank also keeps any output to standard error/out and logs that as well. Open the “Execution Log” tab to browse it. In the screenshot below you see multiple entries labeled “0”. This is because the input (row number) changed and that triggered a computation.